
REMOVAL & INSTALLATION
See Figures 1 and 2
The brake booster is located on the driver's side of the vehicle attached to the firewall.
Before the brake booster is reinstalled, the brake booster pushrod must be adjusted so that there is zero clearance between it and the master cylinder. This adjustment requires the use of factory special tool SST No. 09737-00010 or its equivalent.
 |  |
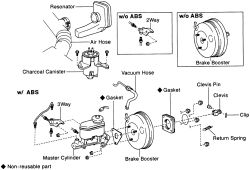
Fig. Fig. 1: Exploded view of the brake booster and related components
- If necessary, remove the instrument lower finish panel, air duct and floor mats to gain access to the brake booster linkage.
- Remove the master cylinder from the vehicle.
- Loosen the hose clamp and disconnect the vacuum hose from the booster.
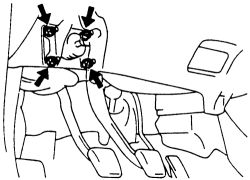
- From inside the passenger compartment, remove the pedal return spring, clip and the clevis pin with the locknut. Remove the four mounting nuts and the clevis.
| |
Fig. Fig. 2: Remove the 4 nuts and clevis pin retaining the brake booster to the inner panel
- Remove the resonator from the air hose.
- On some models it may be necessary to remove the charcoal canister.
- Remove the brake booster, clevis and discard the gasket.
- Connect the clevis pin with locknut to the booster and install the brake booster with a new gasket.
- If removed, install the charcoal canister. Install the resonator to the air hose.
- Install the mounting nuts and tighten them to 9 ft. lbs. (13 Nm).
- Insert the clevis pin through the clevis and the brake pedal. Secure the pin with the retaining clip.
- Install the pedal return spring.
- Adjust the length of the brake booster push rod as follows: set the special tool on the master cylinder with the gasket and lower the pin of the tool until it lightly contacts the position. Turn the special tool upside-down and position it onto the booster. Measure the clearance between the booster push rod and the pin head of the tool. There must be zero clearance. To obtain zero clearance, adjust the push rod length until the pushrod light contacts the head of the pin.
When adjusting the pushrod, depress the brake pedal enough so that the push rod sticks out.
- Install the instrument lower finish panel and air duct.
- Install the master cylinder and connect the vacuum hose to the brake booster.
- Fill the brake fluid reservoir to the proper level with clean brake fluid and bleed the master cylinder and brake system as described in this Section.
WARNING
Clean, high quality brake fluid is essential to the safe and proper operation of the brake system. You should always buy the highest quality brake fluid that is available. If the brake fluid becomes contaminated, drain and flush the system, then refill the master cylinder with new fluid. Never reuse any brake fluid. Any brake fluid that is removed from the system should be discarded.
- Check for leaks. Check and/or adjust the brake pedal, then tighten the clevis lock nut to 19 ft. lbs. (25 Nm).
- Perform a brake booster operational check and air tightness check as detailed below.