
INSPECTION
See Figures 1, 2, 3, 4, 5 and 6
Check the condition of the drive belts and check and adjust the belt tension every 15,000 miles (24,000 km).
 |  |
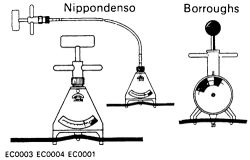
Fig. Fig. 1: Types of belt tension gauges used for checking belt tension
Inspect the belts for signs of glazing or cracking. A glazed belt will be perfectly smooth from slippage, while a good belt will have a slight texture of fabric visible. Cracks will generally start at the inner edge of the belt and run outward. All worn or damaged drive belts should be replaced immediately. It is best to replace all drive belts at one time, as a preventive maintenance measure, during this service operation.
| |
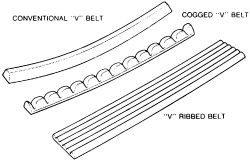
Fig. Fig. 2: There are typically 3 types of accessory drive belts found on vehicles today
| |
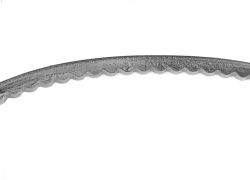
Fig. Fig. 3: An example of a healthy drive belt
| |
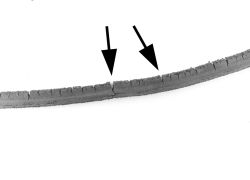
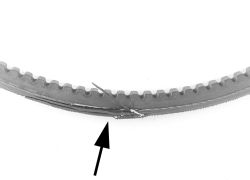
Fig. Fig. 4: Deep cracks in this belt will cause flex, building up heat that will eventually lead to belt failure
| |
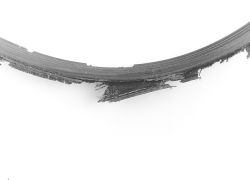
Fig. Fig. 5: The cover of this belt is worn, exposing the critical reinforcing cords to excessive wear
| |
Fig. Fig. 6: Installing too wide a belt can result in serious belt wear and/or breakage
Belt tension does not refer to play or droop. by placing your thumb midway between the two pulleys, it should be possible to depress the belt 1/4-1/2 in. (6-13mm). If any of the belts can be depressed more than this, or cannot be depressed this much, adjust the tension. While this is an inaccurate test, it provides a quick reference. Inadequate tension will always result in slippage or wear, while excessive tension will damage pulley bearings and cause belts to fray and crack. A belt should be tight enough to perform without slipping or squealing.
It is not a bad idea to replace all belts at 60,000 miles (96,000km) regardless of there condition.
ADJUSTMENT Alternator
See Figures 7, 8, 9, 10 and 11
To adjust the tension of the alternator drive belt on all models, loosen the pivot and mounting bolts on the alternator. Using a wooden hammer handle, a broomstick or your hand, move the alternator one way or the other until the proper tension is achieved. Do not use a screwdriver or any other metal device such as a pry bar, as a lever. Tighten the mounting bolts securely, run the engine about a minute, stop the engine then recheck the belt tension.
| |
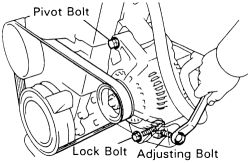
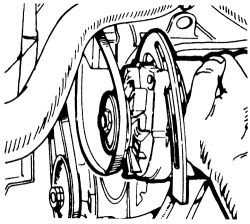
Fig. Fig. 7: Some models use a tension adjusting bolt
| |
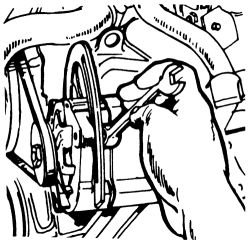
Fig. Fig. 8: Loosen the pivot bolt ...
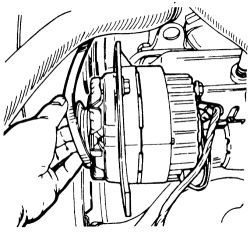
| |
Fig. Fig. 9: ... then push the component inwards
| |
Fig. Fig. 10: Slip the old belt off and the new one on ...
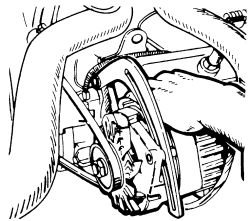
| |
Fig. Fig. 11: ... then pull outwards to tension the belt
A/C compressor (always use caution when working near the A/C compressor) belt tension can be adjusted by turning the tension adjusting bolt which is located on the compressor tensioner bracket. Turn the bolt clockwise to tighten the belt and counterclockwise to loosen it.
Power Steering PumpTension on the power steering belt is adjusted by means of an idler pulley (some models may use just a lower adjusting bracket setup-similar to alternator adjustment service procedure). Loosen the lock bolt and turn the adjusting bolt on the idler pulley until the desired tension is felt and then tighten the lock bolt.
REMOVAL & INSTALLATION
On some engines the washer reservoir tank may need to be removed first. If a belt must be replaced, the driven unit must be loosened and moved to its extreme loosest position, generally by moving it toward the center of the motor. After removing the old belt, check the pulleys for dirt or built-up material which could affect belt contact. Carefully install the new belt, remembering that it is new and unused - it may appear to be just a little too small to fit over the pulley flanges. Fit the belt over the largest pulley (usually the crankshaft pulley at the bottom center of the motor) first, then work on the smaller one(s). Gentle pressure in the direction of rotation is helpful. Some belts run around a third or idler pulley, which acts as an additional pivot in the belt's path. It may be possible to loosen the idler pulley as well as the main component, making your job much easier. Depending on which belt(s) you are changing, it may be necessary to loosen or remove other interfering belts to get at the one(s) you want.
When buying replacement belts, remember that the fit is critical according to the length of the belt, the width of the belt, the depth of the belt and the angle or profile of the V shape (always match up old belt with new belt if possible). The belt shape should exactly match the shape of the pulley; belts that are not an exact match can cause noise, slippage and premature failure.
After the new belt is installed, draw tension on it by moving the driven unit away from the motor and tighten its mounting bolts. This is sometimes a three- or four-handed job; you may find an assistant helpful. Make sure that all the bolts you loosened get retightened and that any other loosened belts also have the correct tension. A new belt can be expected to stretch a bit after installation so be prepared to re-adjust your new belt.
After installing a new belt, run the engine for about 5 minutes and then recheck the belt tension.