
See Figure 1
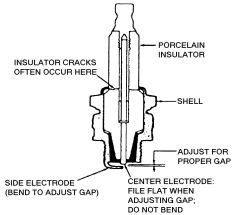
A typical spark plug consists of a metal shell surrounding a ceramic insulator. A metal electrode extends downward through the center of the insulator and protrudes a small distance. Located at the end of the plug and attached to the side of the outer metal shell is the side electrode. The side electrode bends in at a 90( angle so that its tip is just past and parallel to the tip of the center electrode. The distance between these two electrodes (measured in thousandths of an inch or hundredths of a millimeter) is called the spark plug gap.
The spark plug does not produce a spark but instead provides a gap across which the current can arc. The coil produces anywhere from 20,000 to 50,000 volts (depending on the type and application) which travels through the wires to the spark plugs. The current passes along the center electrode and jumps the gap to the side electrode, and in doing so, ignites the air/fuel mixture in the combustion chamber.
 |  |
Fig. Fig. 1: Cross-section of a spark plug
SPARK PLUG HEAT RANGE
See Figure 2
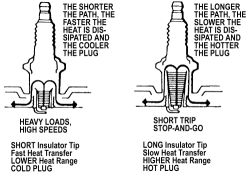
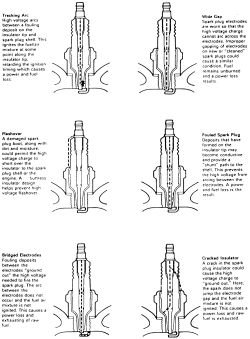
Spark plug heat range is the ability of the plug to dissipate heat. The longer the insulator (or the farther it extends into the engine), the hotter the plug will operate; the shorter the insulator (the closer the electrode is to the block's cooling passages) the cooler it will operate. A plug that absorbs little heat and remains too cool will quickly accumulate deposits of oil and carbon since it is not hot enough to burn them off. This leads to plug fouling and consequently to misfiring. A plug that absorbs too much heat will have no deposits but, due to the excessive heat, the electrodes will burn away quickly and might possibly lead to preignition or other ignition problems. Preignition takes place when plug tips get so hot that they glow sufficiently to ignite the air/fuel mixture before the actual spark occurs. This early ignition will usually cause a pinging during low speeds and heavy loads.
| |
Fig. Fig. 2: Spark plug heat range
The general rule of thumb for choosing the correct heat range when picking a spark plug is: if most of your driving is long distance, high speed travel, use a colder plug; if most of your driving is stop and go, use a hotter plug. Original equipment plugs are generally a good compromise between the 2 styles and most people never have the need to change their plugs from the factory-recommended heat range.
REMOVAL & INSTALLATION
See Figures 3 through 8
A set of spark plugs usually requires replacement after about 30,000 miles (48,000 km), platinum plugs have a 60,000 mile change interval, depending on your style of driving. In normal operation plug gap increases about 0.001 in. (0.025mm) for every 2500 miles (4000 km). As the gap increases, the plug's voltage requirement also increases. It requires a greater voltage to jump the wider gap and about two to three times as much voltage to fire the plug at high speeds than at idle. The improved air/fuel ratio control of modern fuel injection combined with the higher voltage output of modern ignition systems will often allow an engine to run significantly longer on a set of standard spark plugs, but keep in mind that efficiency will drop as the gap widdens (along with fuel economy and power).
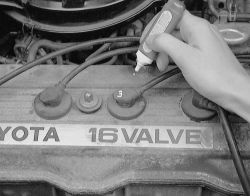
When you're removing spark plugs, work on one at a time. Don't start by removing the plug wires all at once, because, unless you number them, they may become mixed up. Take a minute before you begin and number the wires with tape.
- Disconnect the negative battery cable, and if the vehicle has been run recently, allow the engine to thoroughly cool.
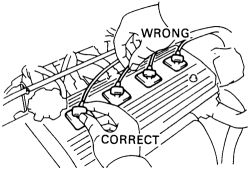
- Carefully twist the spark plug wire boot to loosen it, then pull upward and remove the boot from the plug. Be sure to pull on the boot and not on the wire, otherwise the connector located inside the boot may become separated.
| |
Fig. Fig. 3: Mark the spark plug wires if not already labeled by the manufacturer prior to removal
| |
Fig. Fig. 4: Twist and remove the plug wires correctly or damage to the wires can occur
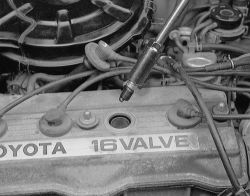
- Using compressed air, blow any water or debris from the spark plug well to assure that no harmful contaminants are allowed to enter the combustion chamber when the spark plug is removed. If compressed air is not available, use a rag or a brush to clean the area.
Remove the spark plugs when the engine is cold, if possible, to prevent damage to the threads. If removal of the plugs is difficult, apply a few drops of penetrating oil or silicone spray to the area around the base of the plug, and allow it a few minutes to work.
- Using a spark plug socket that is equipped with a rubber insert to properly hold the plug, turn the spark plug counterclockwise to loosen and remove the spark plug from the bore.

| |
Fig. Fig. 5: Use an extension to reach the spark plug
| |
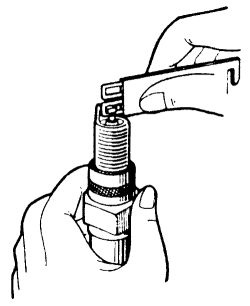
Fig. Fig. 6: Be careful not to drop the plug out of the socket
- Inspect the spark plug boot for tears or damage. If a damaged boot is found, the spark plug wire must be replaced.
- Using a wire feeler gauge, check and adjust the spark plug gap. When using a gauge, the proper size should pass between the electrodes with a slight drag. The next larger size should not be able to pass while the next smaller size should pass freely.
| |
Fig. Fig. 7: If adjusting the gap, bend only the base of the ground electrode, do not touch the tip
- Carefully thread the plug into the bore by hand. If resistance is felt before the plug is almost completely threaded, back the plug out and begin threading again. In small, hard to reach areas, an old spark plug wire and boot could be used as a threading tool. The boot will hold the plug while you twist the end of the wire and the wire is supple enough to twist before it would allow the plug to crossthread.
- Carefully tighten the spark plug. If the plug you are installing is equipped with a crush washer, seat the plug, then tighten about 1/4 turn to crush the washer. If you are installing a tapered seat plug, tighten the plug to specifications provided by the vehicle or plug manufacturer.

| |
Fig. Fig. 8: After the plug is installed, reinsert the spark plug wire. Make sure it enegages
- Apply a small amount of silicone dielectric compound to the end of the spark plug lead or inside the spark plug boot to prevent sticking, then install the boot to the spark plug and push until it clicks into place. The click may be felt or heard, then gently pull back on the boot to assure proper contact.
INSPECTION & GAPPING
See Figures 9 through 19
Check the plugs for deposits and wear. If they are not going to be replaced, clean the plugs thoroughly. Remember that any kind of deposit will decrease the efficiency of the plug. Plugs can be cleaned on a spark plug cleaning machine, which can sometimes be found in service stations, or you can do an acceptable job of cleaning with a stiff brush. If the plugs are cleaned, the electrodes must be filed flat. Use an ignition points file, not an emery board or the like, which will leave deposits. The electrodes must be filed perfectly flat with sharp edges; rounded edges reduce the spark plug voltage by as much as 50%.
Check spark plug gap before installation. The ground electrode (the L-shaped one connected to the body of the plug) must be parallel to the center electrode and the specified size wire gauge (please refer to the Tune-Up Specifications chart for details) must pass between the electrodes with a slight drag.
On platinum spark plug applications DO NOT use a wire brush for cleaning spark plugs. NEVER attempt to adjust gap/clean used platinum spark plugs. Platinum spark plugs should be replaced every 60,000 miles (95,000 km).
Always check the gap on new plugs as they are not always set correctly at the factory. Do not use a flat feeler gauge when measuring the gap on a used plug, because the reading may be inaccurate. A round-wire type gapping tool is the best way to check the gap. The correct gauge should pass through the electrode gap with a slight drag. If you're in doubt, try one size smaller and one larger. The smaller gauge should go through easily, while the larger one shouldn't go through at all. Wire gapping tools usually have a bending tool attached. Use that to adjust the side electrode until the proper distance is obtained. Absolutely never attempt to bend the center electrode. Also, be careful not to bend the side electrode too far or too often as it may weaken and break off within the engine, requiring removal of the cylinder head to retrieve it.
| |
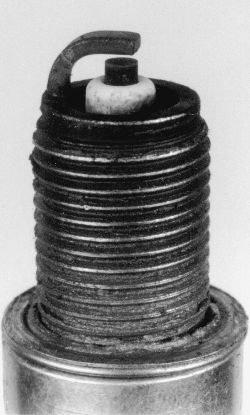
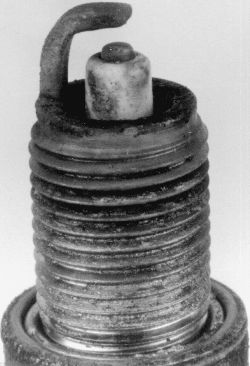
Fig. Fig. 9: A normally worn spark plug should have light tan or gray deposits on the firing tip
| |
Fig. Fig. 10: A carbon fouled plug, identified by soft, sooty, black deposits, may indicate an improperly tuned vehicle. Check the air cleaner, ignition components and engine control system
| |
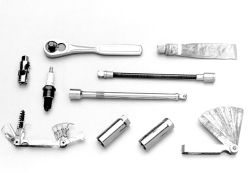
Fig. Fig. 11: A variety of tools and gauges are needed for spark plug service
| |
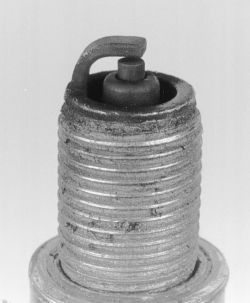
Fig. Fig. 12: A physically damaged spark plug may be evidence of severe detonation in that cylinder. Watch that cylinder carefully between services, as a continued detonation will not only damage the plug, but could also damage the engine
| |
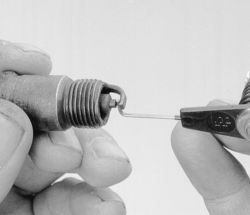
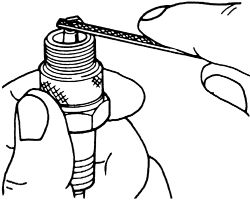
Fig. Fig. 13: Checking the spark plug gap with a feeler gauge

| |
Fig. Fig. 14: An oil fouled spark plug indicates an engine with worn piston rings and/or bad valve seals allowing excessive oil to enter the chamber
| |
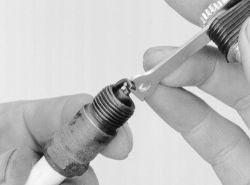
Fig. Fig. 15: Adjusting the spark plug gap
| |
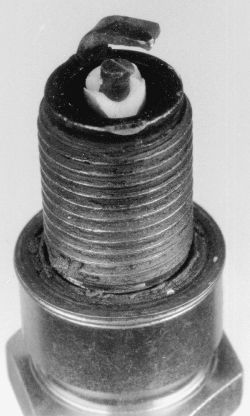
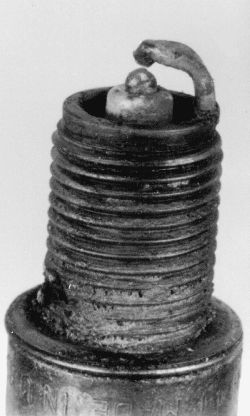
Fig. Fig. 16: This spark plug has been left in the engine too long, as evidenced by the extreme gap-Plugs with such an extreme gap can cause misfiring and stumbling accompanied by a noticeable lack of power
| |
Fig. Fig. 17: If the standard plug is in good condition, the electrode may be filed flat-CAUTION: do not file platinum plugs
| |
Fig. Fig. 18: A bridged or almost bridged spark plug, identified by a build-up between the electrodes caused by excessive carbon or oil build-up on the plug
| |
Fig. Fig. 19: Used spark plugs which show damage may indicate engine problems