
FLUID RECOMMENDATIONS
All vehicles equipped with automatic transaxles use Dexron®II or Dexron III automatic transaxle fluid except All-Trac/4WD models which use Toyota automatic transaxle fluid type T or equivalent.
LEVEL CHECK
See Figure 1
The oil in the automatic transaxle should be checked at least every 15,000 miles or 24 months. If vehicle is operated under severe conditions change the automatic transaxle oil at this service interval.
The fluid level should be checked only when the transaxle is HOT (normal operating temperature). The transaxle is considered hot after about 20 miles of highway driving.
- Park the car on a level surface with the engine idling. Shift the transaxle into N or P and set the parking brake.
 |  |
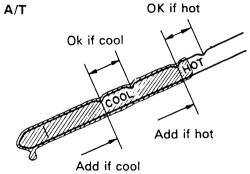
Fig. Fig. 1: Automatic transaxle fluid level indicator
- Remove the dipstick, wipe it clean and reinsert it firmly. Be sure that it has been pushed all the way in. Remove the dipstick and check the fluid level while holding it horizontally. With the engine running, the fluid level should be between the second and third notches on the dipstick.
- If the fluid level is below the second notch, add the required type of transaxle fluid until the proper level is reached. This is easily done with the aid of a funnel. Check the level often as you are filling the transaxle. Be extremely careful not to overfill it. Overfilling will cause slippage, seal damage and overheating. Approximately one pint (0.47L) of transaxle fluid will raise the level from one notch to the other.
The fluid on the dipstick should always be a bright red color. If it is discolored (brown or black), or smells burnt, serious transaxle troubles, probably due to overheating, should be suspected. The transaxle should be inspected by a qualified service (ASE certified) technician to locate the cause of the burnt fluid.
DRAIN AND REFILL
The automatic transaxle has a drain plug so you can remove the plug, drain the fluid, replace the plug and then refill the transaxle.
- Raise and safely support the vehicle as necessary. Remove the plug and gasket if equipped, then drain the fluid into a large pan.
See Figures 2, 3 and 4
| |
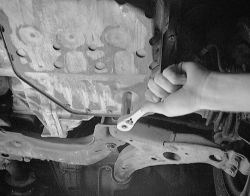
Fig. Fig. 2: Loosen the automatic transaxle drain plug
| |
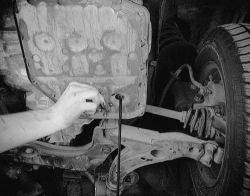
Fig. Fig. 3: Allow all of the fluid to completely drain from the automatic transaxle
Some transaxles use a metal gasket and others a fiber gasket. The metal gasket is reusable. The fiber gasket is not to be reused and must be replaced.
- Install the drain plug and gasket if equipped.
- It is a good idea to measure the amount of fluid drained from the transaxle to determine the correct amount of fresh fluid to add. This is because some parts of the transaxle may not drain completely and using the dry refill amount specified in the Capacities Chart could lead to overfilling. Fluid is added only through the dipstick tube. Always use the proper type automatic transaxle fluid.
- Add automatic transaxle fluid (vehicle must be on a level surface when refilling) to the correct level.
| |
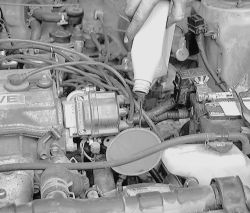
Fig. Fig. 4: With the engine OFF, add new fluid through the dipstick tube using a funnel
- Replace the dipstick after filling. Start the engine and allow it to idle. DO NOT race the engine.
- After the engine has idled for a few minutes, shift the transaxle slowly through the gears (always hold your foot on the brake pedal) and then return it to P. With the engine still idling, check the fluid level on the dipstick. If necessary, add more fluid to raise the level to where it is supposed to be.
- Check the drain plug for transaxle fluid leakage. Dispose of used oil properly. Do not throw it in the trash or pour it on the ground.
PAN &FILTER SERVICE
See Figures 2 and 3
The automatic transaxle filter should be changed every time the transaxle fluid is change. Always replace the transaxle pan gasket when oil pan is removed. Note location of all transaxle oil filter (strainer) retaining bolts. Always torque all transaxle oil pan retaining bolts in progressive steps.
This service operation should be performed with the engine and transaxle COLD.
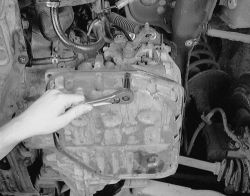
- Raise and safely support the vehicle as necessary. Remove the plug and drain the fluid. When the fluid stops coming out of the drain hole, loosen the pan retaining screws until the pan can be pulled down at one corner. If the pan is stuck, tap the edges lightly with a plastic mallet to loosen it; Don't pry it or wedge a screwdriver into the seam. Lower the corner of the pan and allow the remaining fluid to drain out.
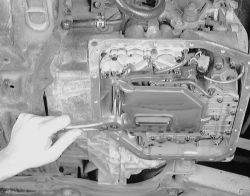
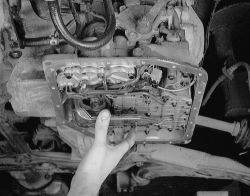
See Figure 5, 6, 7, 8, 9 and 10
| |
Fig. Fig. 5: Remove the pan retaining bolts after draining the system
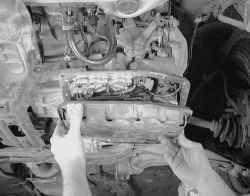
- After the pan has drained completely, remove the pan retaining screws and then remove the pan and gasket.
| |
Fig. Fig. 6: Lower the transaxle pan to access the strainer
- Clean the pan thoroughly and allow it to air dry. If you wipe it out with a rag you run the risk of leaving bits of lint in the pan which will clog the tiny hydraulic passages in the transaxle.
- With the pan removed, the transaxle filter (strainer) is visible. The filter should be changed any time the transaxle oil is drained. Remove the bolts holding the filter and remove the filter and gasket if so equipped.
| |
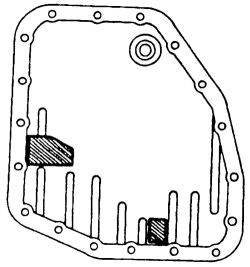
Fig. Fig. 7: Inspect and clean the magnets for metal shavings
| |
Fig. Fig. 8: View of the common oil strainer and gasket
Some filter retaining bolts are different lengths and MUST BE reinstalled in their correct locations. Take great care not to interchange them.
- Clean the mating surfaces for the oil pan and the filter; make sure all traces of the old gasket material is removed.
| |
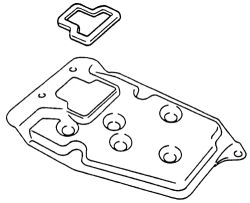
Fig. Fig. 9: Remove the oil strainer mounting bolts and gasket
| |
Fig. Fig. 10: Remove the strainer and replace or clean as needed
- Install the new strainer assembly (some models use a gasket under the oil strainer). Install the retaining bolts in their correct locations and tighten evenly.
- Install the pan (magnets in the correct location in oil pan if so equipped) using a new gasket and tighten the retaining bolts in progressive steps to 45-60 inch lbs.
- Install the drain plug.
- It is a good idea to measure the amount of fluid drained from the transaxle to determine the correct amount of fresh fluid to be added. This is because some parts of the transaxle may not drain completely. Do not overfill the transaxle assembly.
- With the engine OFF, add new automatic transaxle fluid through the dipstick tube to the correct level. Refer to the Capacities Chart at the end of Chapter 1 as necessary.
- Start the engine (always hold your foot on the brake) and shift the gear selector into all positions, allowing each gear to engage momentarily. Shift into P. DO NOT race the engine!
- With the engine idling, check the fluid level. Add fluid up to correct level on the dipstick.
- Check the transaxle oil pan and drain plug for oil leakage. Dispose of used oil properly. Do not throw it in the trash or pour it on the ground.