
See Figure 1
 |  |
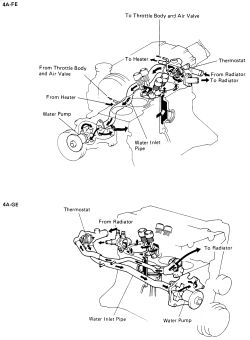
Fig. Fig. 1: View of the cooling system flow-4A-FE and 4A-GE engines
FLUID RECOMMENDATIONS
The correct coolant is any permanent, high quality ethylene glycol antifreeze mixed in a 50/50 concentration with water. This mixture gives the best combination of antifreeze and anti-boil characteristics within the engine.
LEVEL CHECK
See Figures 2 and 3
| |
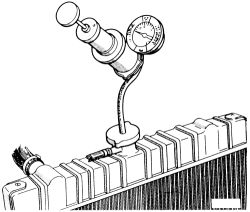
Fig. Fig. 2: Cooling systems should be pressure tested for leaks periodically
| |
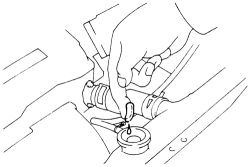
Fig. Fig. 3: On a COLD engine, place your finger in the radiator opening and check for oil and rust deposits
It's best to check the coolant level when the engine is COLD. The radiator coolant level should be between the LOW and the FULL lines on the expansion tank when the engine is cold. If low, check for leakage and add coolant up to the FULL line but do not overfill.
Check the freeze protection rating of the antifreeze at least once a year or as necessary with a suitable antifreeze tester.
DRAIN & REFILL
See Figures 4, 5, 6 and 7
The engine coolant should be changed for the fist time at 45,000 miles (72,000 km) or 36 months which ever comes first. After the initial change Toyota recommends the coolant be changed every 30,000 miles (48,000 km) or 2 years. Replacing the coolant is necessary to remove the scale, rust and chemical by-products which build up in the system.
- Draining the cooling system is always done with the engine COLD.
- Remove the radiator cap.
- Position the drain pan under the draincock on the bottom of the radiator. Additionally, some engines have a draincock on the side of the engine block, near the oil filter. This should be opened to aid in draining the cooling system completely. If for some reason the radiator draincock can't be used, you can loosen and remove the lower radiator hose at its joint to the radiator.
| |
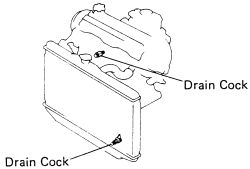
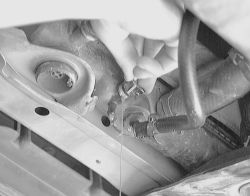
Fig. Fig. 4: View of the draincock locations

| |
Fig. Fig. 5: Removing the engine undercover may be required to access the draincock on the radiator
| |
Fig. Fig. 6: Turn the draincock to allow the coolant to drain from the radiator
- If the lower hose is to be used as the drain, loosen the clamp on the hose and slide it back so it's out of the way. Gently break the grip of the hose on its fitting by twisting or prying with a suitable tool. Do not exert too much force or you will damage the radiator fitting. Remove the hose end from the radiator and direct the hose into the drain pan. You now have fluid running from both the hose and the radiator.
- When the system stops draining, close both draincocks as necessary.
- Using a funnel if necessary, fill the radiator with a 50/50 solution of antifreeze and water. Allow time for the fluid to run through the hoses and into the engine.
- Fill the radiator to just below the filler neck. With the radiator cap off, start the engine and let it idle; this will circulate the coolant and begin to eliminate air in the system. Top up the radiator as the level drops.
- When the level is reasonably stable, shut the engine OFF, and replace the radiator cap. Fill the expansion tank to the correct level and cap the expansion tank.
| |
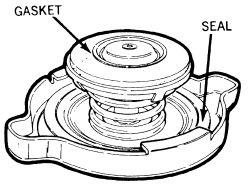
Fig. Fig. 7: Be sure the rubber gasket on the radiator cap has a tight seal
- Drive the car for 10 or 15 minutes; the temperature gauge should be fully within the normal operating range. It is helpful to set the heater to its hottest setting while driving - this circulates the coolant throughout the entire system and helps eliminate air bubbles.
- After the engine has cooled (2-3 hours), check the level in the radiator and the expansion tank, adding coolant as necessary.
FLUSHING THE COOLING SYSTEM
Proceed with draining the system as outlined above. When the system has drained, reconnect any hoses close to the radiator draincock. Move the temperature control for the heater to its hottest position; this allows the heater core to be flushed as well. Using a garden hose or bucket, fill the radiator and allow the water to run out the engine drain cock. Continue until the water runs clear. Be sure to clean the expansion tank as well.
If the system is badly contaminated with rust or scale, you can use a commercial flushing solution to clean it out. Follow the manufacturer's instructions. Some causes of rust are air in the system, failure to change the coolant regularly, use of excessively hard or soft water, and/or failure to use the correct mix of antifreeze and water.
After the system has been flushed, continue with the refill procedures outlined above. Check the condition of the radiator cap and its gasket, replacing the radiator cap as necessary.