
REMOVAL & INSTALLATION
When repairing or replacing the oil pump assembly, the oil pan and strainer should be removed and cleaned.
4A-F EngineSee Figures 1 through 5
- Disconnect the negative battery cable.
- Raise and safely support the vehicle.
- Drain the engine oil in a suitable container.
- Place a jack under the transaxle to support it.
- Remove the splash shield from under the engine.
- Raise the jack under the transaxle slightly.
- Unbolt and lower the center mounting.
- Remove the front pipe from the exhaust manifold and catalyst.
- Remove the two nuts and nineteen bolts retaining the oil pan.
- Insert a blade between the pan and cylinder block, cut off the applied sealer and remove the pan.
- Remove the oil strainer and discard the old gasket.
- Remove the timing belt, idler pulley and crankshaft timing pulley. Refer to Timing Belt and Sprockets later in this section.
- Remove the oil dipstick and tube assembly.
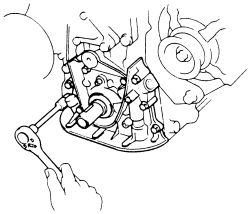
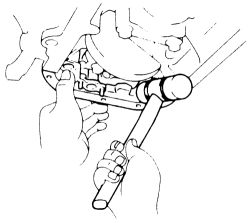
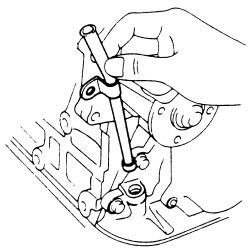
- Unbolt the oil pump, then using a plastic hammer, gently tap on the pump body to loosen.
 |  |
Fig. Fig. 1: Unbolt the oil pump from the engine...
| |
Fig. Fig. 2: ... then carefully tap the pump off
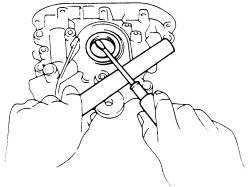
- To replace the oil seal, pry the old seal from the pump.
| |
Fig. Fig. 3: Using a pry tool, remove the oil seal from the pump body
- Carefull tap a new seal into the pump body. The seal must be primed with engine oil or mufti purpose grease prior to installation.
| |
Fig. Fig. 4: Apply a small amount of engine oil on the seal, then carefully tap it into the pump body
- Place a new gasket on the block, then install the pump with the spline teeth of the drive gear engaged with the large teeth of the crankshaft. Secure with the bolts and tighten to 16 ft. lbs. (21 Nm).
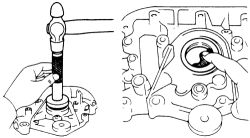
- To install the dipstick, push in the dipstick guide with a new O-ring coated with a small amount of engine oil. Place the O-ring on the guide. Attach the tube with the mounting bolt and insert the dipstick.
| |
Fig. Fig. 5: With a new O-ring, insert the dipstick tube into the engine
- Install the crankshaft timing pulley, idler pulley and timing belt. Refer to Timing Belt and Sprockets later in this section.
- Place the new oil strainer gasket and strainer into position and tighten the bolts to 82 inch lbs. (9 Nm).
- Install the oil pan and tighten the mounting bolts.
- Using new gaskets, attach the front exhaust pipe to the manifold and catalyst.
- Attach the center mounting and tighten the member side bolts to 38 ft. lbs. (52 Nm), plate side to 17 ft. lbs. (23 Nm).
- Lower the jack from the transaxle.
- Lower the vehicle, and fill the crankcase with the appropriate amount of engine oil. Refer to the Capacities chart.
- Connect the negative battery cable, start the engine and check for leaks. If all is well, raise the vehicle slightly and install the engine under cover.
- Recheck the engine oil level, top off if necessary.
- Remove the hood.
- Disconnect the negative battery cable and raise the vehicle. Safely support it on jackstands.
- Drain the engine oil.
- Remove the engine under covers.
- Remove the timing belt. Refer to the Timing Belt Removal and Installation later in this section.
- Remove the bolt securing the idler pulley and tension spring.
- Remove the crankshaft timing pulley. Position shop rags to prevent damage to components. If the pulley can not be removed by hand, use two pry tools.
- On the 7A-FE engines, remove the oil dipstick guide and dipstick. Disconnect the crankshaft position sensor wiring from the guide. Remove the mounting bolt and pull out the guide and gauge. Remove the old O-ring from the guide and discard.
- Remove the front exhaust pipe. Disconnect the oxygen sensor wiring. Remove the bolts holding the front pipe to the mounting bracket. Unbolt the support bracket retaining the TWC to the front pipe. Remove the nuts and lower the pipe.
- On the 4A-FE engine, Unbolt the stiffener plate.
- Remove the oil pan.
- On the 7A-FE engine, unbolt and remove the oil pan baffle plate.
- Remove the oil pick-up and strainer assembly.
- On the 7A-FE engines, remove the No. 1 oil pan.
- Unbolt the oil pump. On the 7A-FE engines, remove the bolt and the crankshaft position sensor, then the pump retaining bolts and pump. If the unit is secure to the body, use a plastic hammer and tap gently to separate. Discard the gasket.
- To replace the oil seal, pry the old seal from the pump.
- Carefull tap a new seal into the pump body. The seal must be primed with engine oil or mufti purpose grease prior to installation.
- Place a new gasket on the block, then install the pump with the spline teeth of the oil pump rotor engaged with the large teeth of the crankshaft. Secure with the bolts and tighten to 16 ft. lbs. (21 Nm).
Be sure the long bolt is in the correct position. On the 7A-FE engine, install the crankshaft position sensor.
- On the 7A-FE engine, install the No. 1 oil pan. Refer to Oil Pan Removal and Installation earlier in this section.
- Attach the oil strainer using a new gasket and tighten to 82 inch lbs. (9 Nm).
- Install the oil pan. Refer to Oil pan Removal and Installation earlier in this section.
- On the 4A-FE engine, attach the stiffener plate and tighten to 17 ft. lbs. (23 Nm).
- Attach the front pipe. Connect the oxygen sensor wiring if removed.
- Install the oil dipstick guide and dipstick. Place a new O-ring on the end of the tube. Tighten the dipstick retaining bolt to 82 inch lbs. (9 Nm). On the 7A-FE engines, connect the crankshaft position sensor wiring to the dipstick guide.
- Insatall the crankshaft timing pulley. Align the pulley set key with the key groove of the pulley. Slide the timing pulley, facing the flange side inward.
- Temporarily install the idler pulley and tension spring. Do not tighten the bolt yet. Push the pulley as far left as it will go and tighten the bolt.
- Install the timing belt.
- Lower the jack from the transaxle.
- Lower the vehicle, and fill the crankcase with the appropriate amount of engine oil. Refer to the Capacities chart.
- Connect the negative battery cable, start the engine and check for leaks. If all is well, raise the vehicle slightly and install the engine under cover.
- Recheck the engine oil level, top off if necessary.
- Install the hood.
- Remove the hood.
- Disconnect the negative battery cable.
- Drain the engine oil. Make sure the old gasket is discarded, and an new one installed prior to drainplug installation.
- Remove the timing belt, idler pulley and crankshaft timing pulley.
When removing the RH engine mounting, attach the engine hoist chain to the lifting bracket on the engine and raise the engine slightly.
- Remove the oil dipstick and tube assembly. Discard the O-ring.
- Remove the front exhaust pipe from the engine.
- Remove the stiffener plate from the engine. Unbolt the flywheel housing cover.
- Remove the oil pan as previously outlined.
- Remove the oil pick-up and strainer.
- Remove the oil pan baffle plate.
- Remove the oil pump retaining bolts. Using a plastic hammer gently tap the edge of the pump to release.
- To replace the oil seal, pry the old seal from the pump.
- Carefull tap a new seal into the pump body. The seal must be primed with engine oil or mufti purpose grease prior to installation.
- Place a new gasket on the cylinder block, install the oil pump to the block with the spline teeth of the drive gear engaged with the large teeth of the crankshaft. Install and tighten the retaining bolts to 16 ft. lbs. (21 Nm). Make sure the long bolt is in the correct position.
- To install the baffle plate, using a razor blade and gasket scraper, remove all traces of packing (FIPG) material from the gasket surfaces. Thoroughly clean all main surfaces to remove loose material. Clean both sealing surfaces with non-residue solvent.
- Apply new packing (FIPG) 08826-00080 to the baffle. Avoid apply excessive amounts to the surface.
Parts must be assembled within 3 mins of application. Otherwise, the sealer (FIPG) must be removed and reapplied.
- Install and secure the oil baffle plate.
- Place a new oil strainer gasket and install the oil strainer with the retaining bolts and nuts. Tighten to 82 inch lbs. (9 Nm).
- Install the oil pan as described earlier in this section.
- Install the flywheel housing under cover.
- Attach the stiffener plate tightening the retaining bolts to 27 ft. lbs. (37 Nm).
- Install the front exhaust pipe.
- Install the oil dipstick guide and dipstick. Place a new O-ring on the end of the tube. Tighten the dipstick retaining bolt to 82 inch lbs. (9 Nm).
- Install the crankshaft timing pulley, idler pulley and timing belt as described later in this section.
- Lower the jack from the transaxle.
- Lower the vehicle, and fill the crankcase with the appropriate amount of engine oil. Refer to the Capacities chart.
- Connect the negative battery cable, start the engine and check for leaks. If all is well, raise the vehicle slightly and install the engine under cover.
- Recheck the engine oil level, top off if necessary.
- Install the hood.