
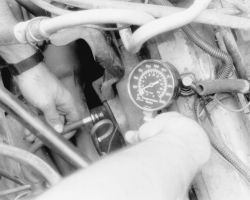
See Figure 1
Anything that generates heat and/or friction will eventually burn or wear out (ie. a light bulb generates heat, therefore its life span is limited). With this in mind, a running engine generates tremendous amounts of both; friction is encountered by the moving and rotating parts inside the engine and heat is created by friction and combustion of the fuel. However, the engine has systems designed to help reduce the effects of heat and friction and provide added longevity. The oiling system reduces the amount of friction encountered by the moving parts inside the engine, while the cooling system reduces heat created by friction and combustion. If either system is not maintained, a break-down will be inevitable. Therefore, you can see how regular maintenance can affect the service life of your vehicle. If you do not drain, flush and refill your cooling system at the proper intervals, deposits will begin to accumulate in the radiator, thereby reducing the amount of heat it can extract from the coolant. The same applies to your oil and filter; if it is not changed often enough it becomes laden with contaminates and is unable to properly lubricate the engine. This increases friction and wear.
There are a number of methods for evaluating the condition of your engine. A compression test can reveal the condition of your pistons, piston rings, cylinder bores, head gasket(s), valves and valve seats. An oil pressure test can warn you of possible engine bearing, or oil pump failures. Excessive oil consumption, evidence of oil in the engine air intake area and/or bluish smoke from the tail pipe may indicate worn piston rings, worn valve guides and/or valve seals. As a general rule, an engine that uses no more than one quart of oil every 1000 miles is in good condition. Engines that use one quart of oil or more in less than 1000 miles should first be checked for oil leaks. If any oil leaks are present, have them fixed before determining how much oil is consumed by the engine, especially if blue smoke is not visible at the tail pipe.
COMPRESSION TEST
A noticeable lack of engine power, excessive oil consumption and/or poor fuel mileage measured over an extended period are all indicators of internal engine wear. Worn piston rings, scored or worn cylinder bores, blown head gaskets, sticking or burnt valves, and worn valve seats are all possible culprits. A check of each cylinder's compression will help locate the problem.
A screw-in type compression gauge is more accurate than the type you simply hold against the spark plug hole. Although it takes slightly longer to use, it's worth the effort to obtain a more accurate reading.
- Make sure that the proper amount and viscosity of engine oil is in the crankcase, then ensure the battery is fully charged.
- Warm-up the engine to normal operating temperature, then shut the engine OFF.
- Disable the ignition system.
- Label and disconnect all of the spark plug wires from the plugs.
- Thoroughly clean the cylinder head area around the spark plug ports, then remove the spark plugs.
- Set the throttle plate to the fully open (wide-open throttle) position. You can block the accelerator linkage open for this, or you can have an assistant fully depress the accelerator pedal.
 |  |
Fig. Fig. 1: A screw-in type compression gauge is more accurate and easier to use without an assistant
- Install a screw-in type compression gauge into the No. 1 spark plug hole until the fitting is snug.
- According to the tool manufacturer's instructions, connect a remote starting switch to the starting circuit.
- With the ignition switch in the OFF position, use the remote starting switch to crank the engine through at least five compression strokes (approximately 5 seconds of cranking) and record the highest reading on the gauge.
- Repeat the test on each cylinder, cranking the engine approximately the same number of compression strokes and/or time as the first.
- Compare the highest readings from each cylinder to that of the others. The indicated compression pressures are considered within specifications if the lowest reading cylinder is within 75 percent of the pressure recorded for the highest reading cylinder. For example, if your highest reading cylinder pressure was 150 psi (1034 kPa), then 75 percent of that would be 113 psi (779 kPa). So the lowest reading cylinder should be no less than 113 psi (779 kPa).
- If a cylinder exhibits an unusually low compression reading, pour a tablespoon of clean engine oil into the cylinder through the spark plug hole and repeat the compression test. If the compression rises after adding oil, it means that the cylinder's piston rings and/or cylinder bore are damaged or worn. If the pressure remains low, the valves may not be seating properly (a valve job is needed), or the head gasket may be blown near that cylinder. If compression in any two adjacent cylinders is low, and if the addition of oil doesn't help raise compression, there is leakage past the head gasket. Oil and coolant in the combustion chamber, combined with blue or constant white smoke from the tail pipe, are symptoms of this problem. However, don't be alarmed by the normal white smoke emitted from the tail pipe during engine warm-up or from cold weather driving. There may be evidence of water droplets on the engine dipstick and/or oil droplets in the cooling system if a head gasket is blown.
OIL PRESSURE TEST
Check for proper oil pressure at the sending unit passage with an externally mounted mechanical oil pressure gauge (as opposed to relying on a factory installed dash-mounted gauge). A tachometer may also be needed, as some specifications may require running the engine at a specific rpm.
- With the engine cold, locate and remove the oil pressure sending unit.
- Following the manufacturer's instructions, connect a mechanical oil pressure gauge and, if necessary, a tachometer to the engine.
- Start the engine and allow it to idle.
- Check the oil pressure reading when cold and record the number. You may need to run the engine at a specified rpm, so check the specifications chart located earlier in this section.
- Run the engine until normal operating temperature is reached (upper radiator hose will feel warm).
- Check the oil pressure reading again with the engine hot and record the number. Turn the engine OFF.
- Compare your hot oil pressure reading to that given in the chart. If the reading is low, check the cold pressure reading against the chart. If the cold pressure is well above the specification, and the hot reading was lower than the specification, you may have the wrong viscosity oil in the engine. Change the oil, making sure to use the proper grade and quantity, then repeat the test.
Low oil pressure readings could be attributed to internal component wear, pump related problems, a low oil level, or oil viscosity that is too low. High oil pressure readings could be caused by an overfilled crankcase, too high of an oil viscosity or a faulty pressure relief valve.