
REMOVAL & INSTALLATION 4A-GE Engine
See Figure 1
- Disconnect the negative battery cable.
- Disconnect or remove the PCV valve, the accelerator cable and the wiring harness.
- Disconnect (mark or label) the spark plug wires at the plugs and detach the wiring to the noise filter.
- Disconnect the oil pressure sender wire and, if equipped with air conditioning, the wire to the compressor.
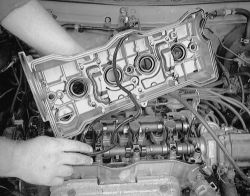
- Remove the four bolts retaining the center cover (between the cam covers) and its gasket.
- Remove the eight cap nuts, the rubber seals and two valve covers.
If the cover is stuck in place, tap a corner with a plastic or rubber mallet. Don't pry the cover up; it will cause deformation and leakage.
- Clean the mating surfaces of the head and the covers.
- Apply RTV sealant to the cylinder head before reassembly. This step is REQUIRED to prevent oil leakage.
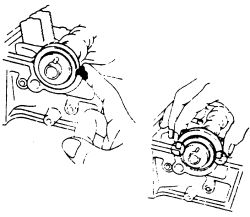
 |  |
Fig. Fig. 1: Apply sealant to these points before reinstalling the valve cover-4A-GE engine
- Install the covers with new gaskets. Install the seals and the cap nut, making sure everything is properly seated. Tighten the cap nuts in several steps to 9 ft. lbs. (12 Nm).
- Install the center cover with its gasket .
- Connect the wiring to the oil pressure sender and the compressor, if equipped.
- Connect the wiring to the noise filter and install the spark plug wires.
- Connect, in this order, the wiring harness, the accelerator cable, the PCV valve and the negative battery cable.
- Start the engine and check for leaks after the engine has warmed up. Minor leaks may be cured by slightly snugging the cover bolts. Any leak that is still present after about a 1/4 turn CANNOT be cured by further tightening. Remove the cover again and either reposition or replace the gasket.
See Figure 2 through 7
- Disconnect the negative battery cable.
- Disconnect the PCV and the vacuum hose.
- Loosen the engine wiring harness running over the upper timing belt cover for easier access to the valve cover.
- Remove the spark plug wires (mark or label) from the spark plugs.
| |
Fig. Fig. 2: Twist, then pull the wires from the rocker cover
- Remove the 3 cap nuts, the seals below them and the valve cover.
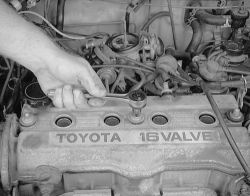
| |
Fig. Fig. 3: Loosen the three valve cover retaining nuts

| |
Fig. Fig. 4: Remove the cap nuts and seals, then lift the valve cover off the cylinder head
| |
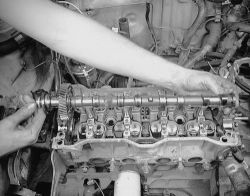
Fig. Fig. 5: Lift the valve cover off the cylinder head ...
| |
Fig. Fig. 6: ... then remove and discard the old gasket
- Clean the mating surfaces of the head and the cover. Install a new gasket before installing the valve cover.
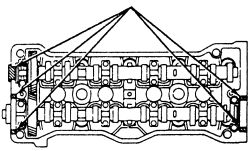
- Apply RTV sealant to the cylinder head before reassembly. This step is REQUIRED to prevent oil leakage.
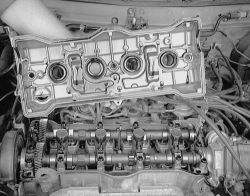
| |
Fig. Fig. 7: Apply sealant to these points before reinstalling the valve cover-4A-F, 4A-FE and 7A-FE engines
- Install the cover with a new gasket. Install the seals and the cap nut, making sure everything is properly seated. Tighten the cap nuts in steps to 6-9 ft. lbs. (8-12 Nm).
- Reconnect the spark plug wires and reposition the wiring harness over the timing belt cover.
- Connect the vacuum hose, the PCV hose and the negative battery cable.
- Start the engine and check for leaks after the engine has warmed up. Minor leaks may be cured by slightly snugging the cover bolts. Any leak that is still present after about a 1/4 turn CANNOT be cured by further tightening. Remove the cover again and either reposition or replace the gasket.