
OPERATION
See Figures 1 and 2
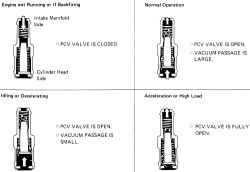
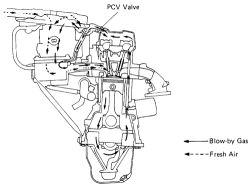
A closed positive crankcase ventilation system is used on all Toyota models. This system cycles incompletely burned fuel which works its way past the piston rings back into the intake manifold for reburning with the fuel/air mixture. The oil filler cap is sealed and the air is drawn from the top of the crankcase into the intake manifold through a valve with a variable orifice.
This valve (commonly known as the PCV valve) regulates the flow of air into the manifold according to the amount of manifold vacuum.
 |  |
Fig. Fig. 1: The PCV valve opens and closes according to engine operating conditions
| |
Fig. Fig. 2: PCV system flow
A plugged valve or hose may cause a rough idle, stalling or low idle speed, oil leaks in the engine and/or slugging and oil deposits within the engine and air cleaner. A leaking valve or hose could cause an erratic idle or stalling.
COMPONENT TESTING
Inspect the PCV system hoses and connections at each tune-up and replace any deteriorated hoses. Check the PCV valve at every tune-up and replace it at 30,000 mile (48,000 km) intervals.
The PCV valve is easily checked with the engine running at normal idle speed (warmed up).
- Remove the PCV valve from the valve cover or intake manifold, but leave it connected to its hose.
- Start the engine.
- Place your thumb over the end of the valve to check for vacuum. If there is no vacuum, check for plugged hoses or ports. If these are open, the valve is faulty.
- With the engine OFF, remove the valve completely. Shake it end-to-end, listening for the rattle of the needle inside the valve. If no rattle is heard, the needle is jammed (probably due to oil sludge) and the valve should be replaced.
An engine without crankcase ventilation is quickly damaged. It is important to check the PCV at regular intervals. When replacing a PCV valve you must use the correct one for the engine. Many valves look alike on the outside, but have different mechanical values. Putting the incorrect valve on a vehicle can cause a great deal of driveability problems.
REMOVAL & INSTALLATION
- Pull the PCV valve from the valve cover.
- Remove the hose from the valve.
- Check the valve for proper operation. While the valve is removed, the hoses should be checked for splits, kinks and blockages. Check the vacuum port (that the hoses connect to) for any clogging.
- Inspect the rubber grommet the PCV valve fits into. If it is in any way deteriorated or oil soaked, replace it.
- Insert a new valve into the hose.
- Push the valve into the rubber grommet. Make sure the valve is firmly into place.