
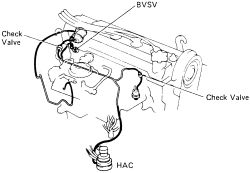
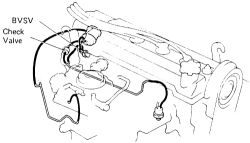
See Figures 1 and 2
The spark control system is used to reduce the NOx and HC emissions. The system serves to delay the vacuum advance for a given time, while also lowering the maximum combustion temperature.
 |  |
Fig. Fig. 1: Spark Control (SC) system components-except California models
| |
Fig. Fig. 2: Spark control system components used on California models
TESTING Vacuum Advancer
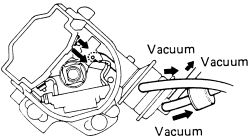
See Figure 3
- Remove the distributor cap and rotor.
- Apply vacuum to the retard diaphragm, then the advance diaphragm. Check that the vacuum advancer moves in accordance with the vacuum.
| |
Fig. Fig. 3: Check the vacuum advance mechanism for movement when vacuum is applied
- If a problem is found, replace the vacuum advancer. Install the cap and rotor.
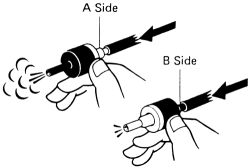
See Figure 4
- Check that air flows from side A of the valve to side B.
| |
Fig. Fig. 4: Air should flow from side A to B, but not from side B to A
- Check that air does not flow from side B to side A. If the valve is not in working order, replace it.
- Drain the coolant from the radiator into a suitable container.
- Remove the BVSV.
- Cool the BVSV in water below 104°F (40° C).
- Blow air into a pipe and check that the BVSV is closed.
- Heat the valve in water above 129° F (54° C).
- Blow air into the pipe and check that the valve is open.
- Apply liquid sealer to the first few threads of the valve and reinstall it in the engine.
- Fill the radiator with coolant and water mixture. Start the engine and check for leaks.
- If a problem is found with the testing of the BVSV, replace the valve.