
REMOVAL & INSTALLATION
See Figure 1
- Remove the 3 upper strut mounting nuts and carefully remove the strut assembly.
WARNING
Do not loosen the center nut on the top of the shock absorber piston.
- Place the strut assembly in vise. Position a bolt and two nuts between the bracket at the lower portion of the shock absorber shell and clamp shock absorber in a vise. The bolt acts as a spacer to allow for clamping without crushing the bracket.
Do not attempt to clamp the strut assembly in a flat jaw vise as this will result in damage to the strut tube.
- Attach a spring compressor and compress the spring until the upper suspension support is free of any spring tension. Do not over-compress the spring.
- Hold the upper support and then remove the nut on the end of the shock piston rod.
- Remove the support, coil spring, insulator and bumper.
To install
- Loosely assemble all components onto the strut assembly. Make sure the spring end aligns with the hollow in the lower seat.
- Align the upper suspension support with the piston rod and install the support.
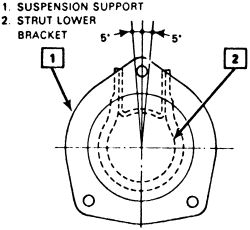
- Align the suspension support with the strut lower bracket. This assures the spring will be properly seated top and bottom.
 |  |
Fig. Fig. 1: Correct position of the upper and lower mounts when reassembling the rear strut
- Compress the spring slightly by pushing on the suspension support with one hand to expose the strut piston rod threads.
- Install a new strut piston nut and tighten it to 36 ft. lbs. (49 Nm).
- Place the complete strut assembly into the lower mount and mount it in position with the bolts.
- Use a floor jack to gently raise the suspension and guide the upper strut mount into position.
CAUTION
The car is on jackstands. Elevate the floor jack only enough to swing the strut into position; do not raise the car.
- Install all remaining components. Refer to McPherson Struts (2WD Models) later in this section.