
TESTING
See Figure 1
The purpose of the shock absorber is simply to limit the motion of the spring during compression and rebound cycles. If the vehicle is not equipped with these motion dampers, the up and down motion would multiply until the vehicle was alternately trying to leap off the ground and to pound itself into the pavement.
Countrary to popular rumor, the shocks do not affect the ride height of the vehicle. This is controlled by other suspension components such as springs and tires. Worn shock absorbers can affect handling; if the front of the vehicle is rising or falling excessively, the "footprint" of the tires changes on the pavement and steering is affected.
The simplest test of the shock absorber is simply push down on one corner of the unladen vehicle and release it. Observe the motion of the body as it is released. In most cases, it will come up beyond it original rest position, dip back below it and settle quickly to rest. This shows that the damper is controlling the spring action. Any tendency to excessive pitch (up-and-down) motion or failure to return to rest within 2-3 cycles is a sign of poor function within the shock absorber. Oil-filled shocks may have a light film of oil around the seal, resulting from normal breathing and air exchange. This should NOT be taken as a sign of failure, but any sign of thick or running oil definitely indicates failure. Gas filled shocks may also show some film at the shaft; if the gas has leaked out, the shock will have almost no resistance to motion.
 |  |
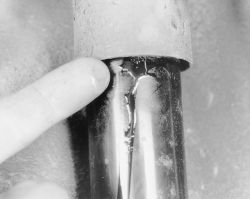
Fig. Fig. 1: When fluid is seeping out of the shock absorber, it's time to replace it
While each shock absorber can be replaced individually, it is recommended that they be changed as a pair (both front or both rear) to maintain equal response on both sides of the vehicle. Chances are quite good that if one has failed, its mate is weak also.
REMOVAL & INSTALLATION
- Loosen the lug nuts on the wheels where the shock absorbers are going to be removed. Only loosen the lug nuts a maximum of 1/2 of a turn.
- Raise and support the vehicle with jackstands under the vehicle's frame.
- Remove the rear wheel(s).
- Remove the upper mounting nuts from the shock absorber. Make sure to note the locations of the various washers, bushings and nuts. Use a tool to keep the shaft from spinning.
- Remove the lower shock retaining nut where it attaches to the rear axle housing.
Always remove and install the shock absorbers one at a time. Do not allow the rear axle to hang.
- Lower the rear axle and remove the shock absorber from the vehicle.
- Mount the shock absorber with the lower mounting bolt. Only tighten the lower bolt until snug.
- Raise the rear axle with the floor jack until the shock absorber upper mounting stud or boss is in line with the mounting component. Only tighten the upper mounting bolt until snug.
- Lower the rear axle, install the wheel and lower the vehicle to the ground.
- Push the vehicle down a couple of times to settle the suspension.
- Tighten the upper mounting nuts to 18 ft. lbs. (25 Nm) and the lower nuts to 37 ft. lbs. (50 Nm).