
REMOVAL & INSTALLATION With Disc Brakes
See Figures 1, 2 and 3
- Raise and support the appropriate end of the vehicle safely using jackstands, then remove the wheel.
- Remove the brake pads and caliper. Support the caliper aside using wire or a coat hanger. For details, please refer to of this repair guide.
- Remove the outer wheel bearing and lift off the rotor. For details on wheel bearing removal, installation and adjustment, please refer to of this repair guide.
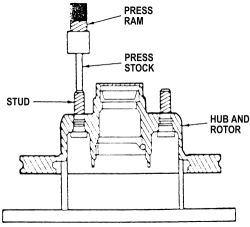
- Properly support the rotor using press bars, then drive the stud out using an arbor press.
If a press is not available, CAREFULLY drive the old stud out using a blunt drift. MAKE SURE the rotor is properly and evenly supported or it may be damaged.
 |  |
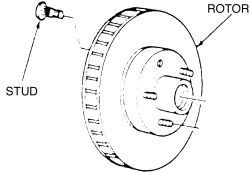
Fig. Fig. 1: View of the rotor and stud assembly
| |
Fig. Fig. 2: Pressing the stud from the rotor
- Clean the stud hole with a wire brush and start the new stud with a hammer and drift pin. Do not use any lubricant or thread sealer.
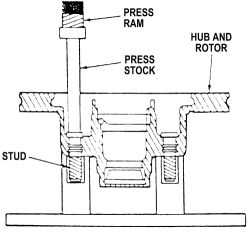
- Finish installing the stud with the press.
| |
Fig. Fig. 3: Use a press to install the stud into the rotor
If a press is not available, start the lug stud through the bore in the hub, then position about 4 flat washers over the stud and thread the lug nut. Hold the hub/rotor while tightening the lug nut, and the stud should be drawn into position. MAKE SURE THE STUD IS FULLY SEATED, then remove the lug nut and washers.
- Install the rotor and adjust the wheel bearings.
- Install the brake caliper and pads.
- Install the wheel, then remove the jackstands and carefully lower the vehicle.
- Tighten the lug nuts to the proper torque.
See Figures 4, 5 and 6
- Raise the vehicle and safely support it with jackstands, then remove the wheel.
- Remove the brake drum.
- If necessary to provide clearance, remove the brake shoes, as outlined in of this repair guide.
| |
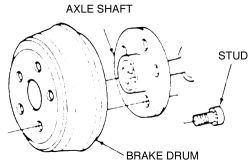
Fig. Fig. 4: Exploded view of the drum, axle flange and stud
| |
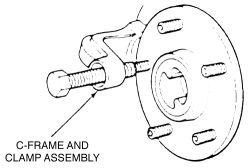
Fig. Fig. 5: Use a C-clamp and socket to press out the stud
| |
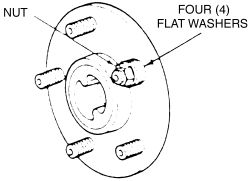
Fig. Fig. 6: Force the stud onto the axle flange using washers and a lug nut
- Using a large C-clamp and socket, press the stud from the axle flange.
- Coat the serrated part of the stud with liquid soap and place it into the hole.
- Position about 4 flat washers over the stud and thread the lug nut. Hold the flange while tightening the lug nut, and the stud should be drawn into position. MAKE SURE THE STUD IS FULLY SEATED, then remove the lug nut and washers.
- If applicable, install the brake shoes.
- Install the brake drum.
- Install the wheel, then remove the jackstands and carefully lower the vehicle.
- Tighten the lug nuts to the proper torque.