
INSPECTION
See Figures 1 and 2
- Make the front wheels straight and jack up the front of the vehicle.
- Place an 7.09-7.87 in. (180-200mm) wooden block under one front tire.
- Slowly lower the jack until there is about half a load on the front coil spring.
- Support the front of the vehicle with jackstands for safety.
- Make sure that the front wheels are still straight and block them.
- Move the lower suspension arm up and down and check that there is no vertical play in the joint.
- If there is play in the joint, replace it.
- Repeat the procedure for the other side.
REMOVAL & INSTALLATION
- Remove the front wheel from the side of lower control arm removal.
- On models with a stabilizer bar, disconnect the link from the lower control arm.
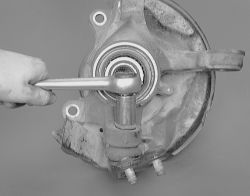
- Remove the steering knuckle with axle hub and mount in a vise-refer to the necessary service procedures.
 |  |
Fig. Fig. 1: With the knuckle secured in a vise, remove the nut from the ball joint
| |
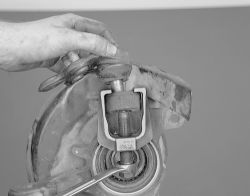
Fig. Fig. 2: Separate the ball joint from the knuckle using a puller
- Remove the dust deflector.
- Remove the cotter pin and nut. Using a puller remove the lower ball joint.
- Install the lower ball joint and tighten the nut to 87 ft. lbs. (118 Nm).
- Install a NEW cotter pin.
- Replace the dust deflector using seal installer and hammer. carefully tap the deflector into position. Install steering knuckle with axle hub.