
REMOVAL & INSTALLATION
See Figures 1, 2 and 3
Some models are not equipped with a front stabilizer bar.
- Raise and support the vehicle safely. Remove the front wheels.
- Disconnect the exhaust system or center pipe (2WD vehicles) or driveshaft assembly (4WD vehicles) as necessary.
 |  |
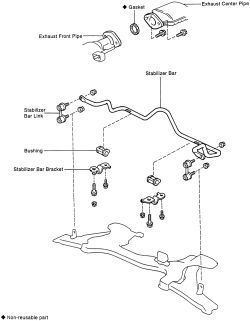
Fig. Fig. 1: Exploded view of the stabilizer bar with links
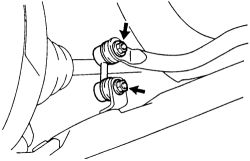
- Disconnect stabilizer links from stabilizer bar by removing the 2 nuts and links.
| |
Fig. Fig. 2: Stabilizer bar links are secured with nuts
If the ball joint turns together with the nut, use a hexagon wrench to hold the stud.
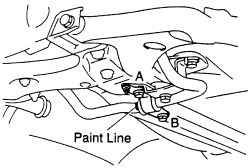
- Mark the positions of the bushing before removal. Disconnect the stabilizer bar brackets from the bolt.
| |
Fig. Fig. 3: Mark the positions of the brackets and bushings on the stabilizer bar
- On some models it will be necessary to disconnect the center exhaust pipe. Discard the old gaskets.
- Remove the stabilizer bar from the vehicle. Examine the insulators (bushings) carefully for any sign of wear and replace them if necessary.
Check the bushings inside the brackets for wear or deformation. A worn bushing can cause a distinct noise as the bar twists during cornering operation.
To install:- Place the bar in position. Place the stabilizer bar bushings in the correct position.
- Temporarily install stabilizer bar brackets. Install both stabilizer bar links tighten link nuts to 33 ft. lbs. (44 Nm).
- Stabilize the suspension. Bounce the vehicle up and down several times to stabilize.
- Tighten the stabilizer bar bracket bolts and nuts; bolt (A) to 108 ft. lbs. (147 Nm), bolt (B) to 37 ft. lbs. (50 (Nm) and tighten nut (C) to 14 ft. lbs. (19 Nm).
- If removed, install the center exhaust pipe, front pipe and driveshaft. Make sure on the exhaust pipes new gaskets are installed.
- Install front wheels and lower the vehicle.
- Check front wheel alignment.