
REMOVAL & INSTALLATION
See Figure 1 through 6
- Raise and support the vehicle safely.
- Remove the wheels.
 |  |
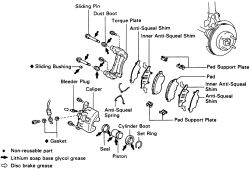
Fig. Fig. 1: Exploded view of the front disc brake components
- Siphon a sufficient quantity of brake fluid from the master cylinder reservoir to prevent any brake fluid from overflowing the master cylinder when removing or installing new pads. This is necessary as the piston must be forced into the caliper bore to provide sufficient clearance when installing the new pads.
- Grasp the caliper from behind and carefully pull it to seat the piston in its bolt.
| |
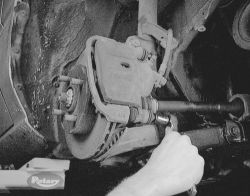
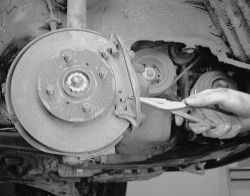
Fig. Fig. 2: Remove the two upper and lower caliper mounting bolts
- Loosen and remove the 2 caliper mounting pins (bolts) and then remove the caliper assembly. Position it aside. Do not disconnect the brake line.
| |
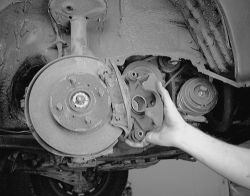
Fig. Fig.3: Pull the caliper away from the rotor
| |
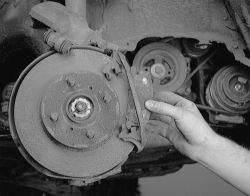
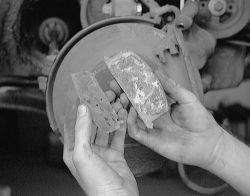
Fig. Fig.4: Remove the brake pads from the caliper
- Slide out the old brake pads along with any anti-squeal shims, springs, pad wear indicators and pad support plates. Make sure to note the position of all assorted pad hardware.
| |
Fig. Fig.5: The shims are removed along with the pads
| |
Fig. Fig.6: Using pliers, remove the spring clips
- Check the brake disc (rotor) for thickness and run-out. Inspect the caliper and piston assembly for breaks, cracks, fluid seepage or other damage. Overhaul or replace as necessary.
- Install the 4 pad support plates into the torque plate.
- Install the pad wear indicators onto the pads. Be sure the arrow on the indicator plate is pointing in the direction of rotation.
- Install the anti-squeal shims on the outside of each pad. Do not allow oil or grease to get on the rubbing face of the pads, then install the pad assemblies into the torque plate. Install 2 anti-squeal springs.
- Position the caliper back down over the pads. If it won't fit, use a C-clamp or a special tool and carefully force the piston into its bore.
- Install and tighten the caliper mounting bolts to 18 ft. lbs. (25 Nm) on 1988-92 models and 25 ft. lbs. (34 Nm) on the 1993-97 models.
- Install the wheels and lower the vehicle. Check the brake fluid level. Before moving the vehicle, make sure to pump the brake pedal a few times to seat the brake pads against the rotors.
INSPECTION
If you hear a squealing noise coming from the front brakes while driving, check the brake lining thickness and pad wear indicator by looking into the inspection hole on the brake cylinder with the front wheels removed and the vehicle properly supported. The wear indicator is designed to emit the squealing noise when the brake pad wears down to about 2.5mm at which time the pad wear plate and the rotor disc rub against each other. If there are traces of the pad wear indicator contacting the rotor disc, the brake pads should be replaced.
To inspect the brake lining thickness, look through the inspection hole and measure the lining thickness using a machinists rule. Also looks for signs of uneven wear. Standard thickness is 10-12mm. The minimum allowable thickness is 0.039 inch (1mm) at which time the brake pads must be replaced.
Always replace the brake pads on both front wheels as a set. When inspecting or replacing the brake pads, check the surface of the disc rotors for scoring, wear and runout. The rotors should be resurfaced if badly scored or replaced if badly worn.