
REMOVAL & INSTALLATION
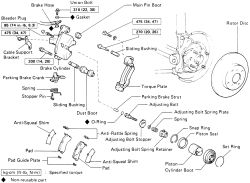
See Figure 1
- Raise and safely support the rear of the vehicle on jackstands. Block the front wheels.
 |  |
Fig. Fig. 1: Exploded view of the rear disc brake comoponents
- Siphon a sufficient quantity of brake fluid from the master cylinder reservoir to prevent the brake fluid from overflowing the master cylinder when removing or installing the brake pads. This is necessary as the piston must be forced into the cylinder bore to provide sufficient clearance to install the new brake pads.
- Remove the wheel, then reinstall 2 lug nuts finger tight to hold the disc in place.
Disassemble brakes one wheel at a time. This will prevent parts confusion and also prevent the opposite caliper piston from popping out during pad installation.
- Remove the mounting (lower) bolt from the torque plate. Do not remove the caliper from the main (upper) pin. Do not disconnect the brake hose.
- Lift the caliper from the bottom so that it hinges upward on the upper pin. Use a piece of wire to hold the caliper up. Do not allow the brake hose to become twisted or kinked during this operation.
- Remove the brake pads with their shims, springs and support plates.
- Check the rotor thickness and run-out. Refer to the Specifications Chart at the end of this section.
- Install pad support plates to the lower sides of the torque plate.
- Install anti-rattle springs to the upper side of the torque plate.
- Install a new anti-squeal shim to the back of each pad and install the pads on the torque plate. Install the pads so that the wear indicator is at the top side.
- Using a special tool SST 09719-14020 or its equivalent to slowly turn the caliper piston clockwise while pressing it into the bore until it locks.
- Lower the caliper so that the pad protrusion fits into the piston stopper groove. Insert the cylinder carefully so the boot is not wedged.
- Install the mounting bolt and tighten it to 14 ft. lbs. (20 Nm).
- Install the rear wheels.
- Adjust the parking brake automatic adjuster by depressing brake pedal several times. Refer to rear caliper removal and installation service procedures.
- Lower the car to the ground and fill the master cylinder reservoir to the correct level. Road test the vehicle for proper operation.
INSPECTION
If you hear a squealing noise coming from the rear brakes while driving, check the brake lining thickness and pad wear indicator by looking into the inspection hole on the brake cylinder with the rear wheels removed and the vehicle properly supported. The wear indicator is designed to emit the squealing noise when the brake pad wears down to 2.5mm at which time the brake pad wear plate and the rotor disc rub against each other. If there are traces of the pad wear indicator contacting the rotor disc, the brake pads should be replaced.
To inspect the brake lining thickness, look through the inspection hole and measure the lining thickness using a machinists rule. Also looks for signs of uneven wear. Standard thickness is 10mm. The minimum allowable thickness is 0.039 inch (1.0mm), at which time the brake pads must be replaced.
Always replace the brake pads on both rear wheels as a set. The brake disc rotors should be refinished on a brake lathe, when replacing the rear brake pads for the brake pads to wear properly.