
INSPECTION
- Inspect all brake parts and springs for rust, wear and damage.
- Measure the brake lining thickness. The minimum allowable thickness is 0.039 inch (1.0mm). If the lining does not meet the minimum specification, replace it.
If one of the brake shoes needs to be replaced, replace all the rear shoes in order to maintain even braking.
- Measure inside diameter of the drum as detailed in this section.
- Place the shoe into the brake drum and check that the lining is in proper contact with the drum's surface. If the contact is improper, repair the lining with a brake shoe grinder or replace the shoe.
- To measure the clearance between brake shoe and parking brake lever, temporarily install the parking brake and automatic adjusting levers onto the rear shoe, using a new C-washer. With a feeler gauge, measure the clearance between the shoe and the lever. The clearance should be within 0.0138 inch (0-0.35mm). If the clearance is not as specified, use a shim to adjust it. When the clearance is correct, stake the C-washer with pliers.
REMOVAL & INSTALLATION
See Figures 1 through 8
The brake shoes are located behind the brake drum in the shape of a half moon. There are two brake shoes on each rear wheel.
 |  |
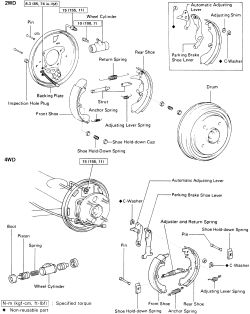
Fig. Fig. 1: Exploded view of the rear brake shoes-1988-92 models
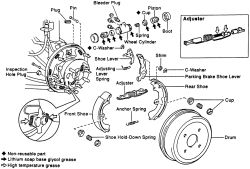
| |
Fig. Fig. 2: Exploded view of the rear brake shoes-1993-97 models
The brake drums should be refinished on a brake lathe, when replacing the rear brake shoes for the brake shoes to wear properly.
- Raise and support the vehicle safely. Remove the wheels.
- Perform the brake drum removal procedure as previously detailed. Do one set of shoes at a time. Note the position and direction of each component part so that they may be reinstalled in the correct order.
| |
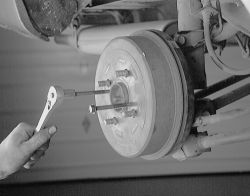
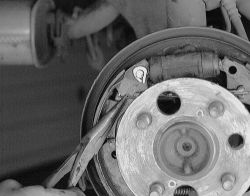
Fig. Fig. 3: Press the drum off the hub by using two bolts
Do not depress the brake pedal once the brake drum has been removed.
- Carefully unhook the return spring from the leading (front) brake shoe. Grasp the hold-down spring pin with pliers and turn it until its in line with the slot in the hold-down spring. Remove the hold-down spring and the pin. Pull out the brake shoe and unhook the anchor spring from the lower edge.
| |
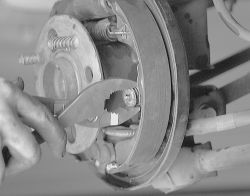
Fig. Fig. 4: While pushing in and turning, remove the hold-down springs
- Remove the hold-down spring from the trailing (rear) shoe. Pull the shoe out with the adjuster strut, automatic adjuster assembly and springs attached and disconnect the parking brake cable. Unhook the return spring and then remove the adjusting strut. Remove the anchor spring.
| |
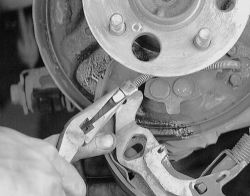
Fig. Fig. 5: Remove the return spring. This can be done with pliers

| |
Fig. Fig. 6: Pull on both shoes and remove the assembly from the backing plate
| |
Fig. Fig. 7: Disconnect the parking cable from the shoe
- Remove the adjusting strut. Unhook the adjusting lever spring from the rear shoe and then remove the automatic adjuster assembly by popping out the C-clip.
- Inspect the shoes for signs of unusual wear or scoring.
- Check the wheel cylinder for any sign of fluid seepage or frozen pistons.
- Clean and inspect the brake backing plate and all other components. Check that the brake drum inner diameter is within specified limits. Lubricate the backing plate bosses and the anchor plate.
- Mount the automatic adjuster assembly onto a new rear brake shoe. Make sure the C-clip fits properly. Connect the adjusting strut/return spring and then install the adjusting spring.
- Connect the parking brake cable to the rear shoe and then position the shoe so the lower end rides in the anchor plate and the upper end is against the boot in the wheel cylinder. Install the pin and the hold-down spring. Rotate the pin so the crimped edge is held by the retainer.
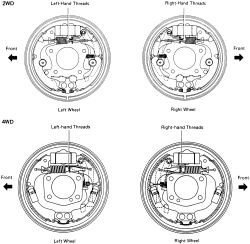
| |
Fig. Fig. 8: Assemble the rear brake shoes in the correct direction as shown
- Install the anchor spring between the front and rear shoes and then stretch the spring enough so the front shoe will fit as the rear did in Step 10. Install the hold-down spring and pin. Connect the return spring/adjusting strut between the 2 shoes and connect it so it rides freely.
- Check that the automatic adjuster is operating properly; the adjusting bolt should turn when the parking brake lever (in the brake assembly) is moved. Adjust the strut as short as possible and then install the brake drum. Set and release the parking brake fully several times.
- Check clearance between brake shoes and drum if necessary by measuring the brake drum inside diameter and diameter of the brake shoes. Check that the difference between the diameters is the correct rear brake shoe clearance. The rear brake shoe clearance specification is 0.024 inch (0.6mm) for all vehicles.
- Install the wheel and lower the vehicle. Bleed brake system if necessary. Check the level of brake fluid in the master cylinder. Road test the vehicle for proper operation.
ADJUSTMENTS
Most models are equipped with self-adjusting rear drum brakes. Under normal conditions, adjustment of the rear brake shoes should not be necessary. However, if an initial adjustment is required insert the blade of a brake adjuster tool or a screw driver into the hole in the brake drum and turn the adjuster slowly. The tension is set correctly if the tire and wheel assembly will rotate approximately 3 times when spun with moderate force. Do not over adjust the brake shoes. Before adjusting the rear drum brake shoes, make sure emergency brake is in the OFF position, and all cables are free.