
REMOVAL & INSTALLATION
See Figure 1
- Using a syringe or similar device, remove as much fluid as possible from the master cylinder reservoir.
 |  |
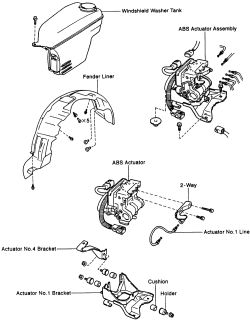
Fig. Fig. 1: Exploded view of the ABS actuator mounting
- Remove the washer tank and wheel well housing.
- Disconnect the electrical connectors at the actuator.
- Using special tool 09751-36011 or equivalent, disconnect each brake line from the actuator assembly. Disconnect the brake line clamp from the strut tower.
- Remove the nuts and bolts holding the actuator and bracket to the vehicle.
- Remove the actuator unit with the bracket attached.
- Install the bracket if removed and tighten the nuts to 48 inch lbs. (5.4 Nm)
- Place the actuator into position. Tighten the retaining nuts to 48 inch lbs. (5.4 Nm). If the unit is held by bolts, tighten them to 14 ft. lbs. (19 Nm).
- Connect the brake lines to the actuator, tightening them to 11 ft. lbs. (15 Nm). Install the brake line clamp at the strut tower.
- Connect the wiring connectors. Install the washer tank and inner wheel well.
- Fill the reservoir with brake fluid. Bleed the system.
- Inspect the system for leakage, particularly at any line fitting which was loosened or disconnected.