
REMOVAL & INSTALLATION 1988-92 Models
See Figures 1 through 5
- Disconnect the negative battery cable.
 |  |
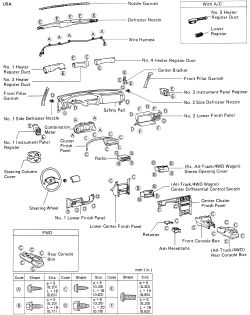
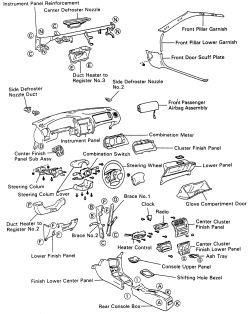
Fig. Fig. 1: Exploded view of the instrument panel-1988-92 USA models

| |
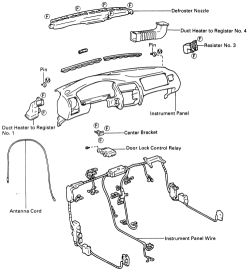
Fig. Fig. 2: Exploded view of the instrument panel-1988-92 Canadian models
- Remove the steering wheel. Disarm air bag system if so equipped.
- Unbolt and remove the right and left front pillar garnish trim.
- Remove the rear then front floor console boxes. Disconnect the wiring.
- Remove the engine hood release lever.
- Next, detach the lower finish No. 1 trim panel. Remove the No. 1 speaker panel. Pry out the two panel hole covers. Pull pout the lower finish panel No. 1, then disconnect the speaker wires. On models with A/C, disconnect the No. 5 heater register duct.
- Remove the steering column cover.
| |
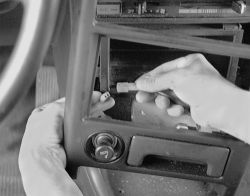
Fig. Fig. 3: Pull the center trim out and disconnect any wiring
- Remove the center cluster finish panel. Disconnect the wiring and remove the switches.
| |
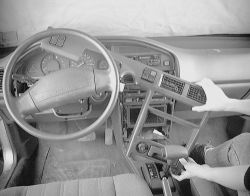
Fig. Fig. 4: With everything disconnected, pull the trim panel out from the dash
- Remove the cluster finish panel and detach the wiring to the unit.
- Remove the radio and disconnect the antenna wire and harness from behind the unit..
- Remove the stereo opening cover or center differential control switch if so equipped. Remove any wiring from components.
| |
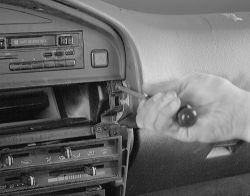
Fig. Fig. 5: Remove the screws retaining the upper trim panel
- Remove the combination meter assembly. Disconnect the wiring.
- Remove the lower finish No. 2 panel with glove compartment door.
- Separate the heater control assembly from the safety pad and hang it.
- Remove the lower center finish panel.
- Remove the No. 1 and No. 2 side defroster nozzles. Be sure to tape the end of the removal tool to avoid scratching the dash components.
- Remove the safety pad assembly from the vehicle. Disconnect the wiring.
The defroster nozzle has a boss on the reverse side for clamping onto the clip on the body side. When removing, pull upward at an angle.
- Installation is the reverse of the removal procedure.
See Figures 6, 7 and 8
- Disconnect the negative battery cable.
| |
Fig. Fig. 6: Exploded view of the instrument panel-1993-97 models
| |
Fig. Fig. 7: Exploded view of the instrument panel (continued)-1993-97 models
-
Remove the following components:
Front door lower garnishesFront door scuff platesFront pillar garnishes
- Remove the steering wheel. Refer to .
| |
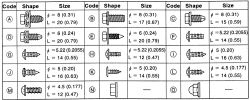
Fig. Fig. 8: Fasteners used to secure the instrument panel and its components
-
Remove the following components:
Steering column coverShifting hole bezelRear console boxHood lock release leverLower finish panelCombination switchLower panel
-
Remove the glove box compartment door. Detach the connector cover from the compartment door.
- Remove the wiring from the connector cover.
- Detch the wiring from the harness.
- Remove the screws and bolts from the compartment.
- Remove the glove box door.When handling the airbag connector, take care not to damage the air bag wire harness.
- Remove the center cluster finish lower panel. Disconnect the wiring from the panel cluster. Remove the stereo opening cover.
- Remove the heater knobs, then remove the center cluster finish panel. Unbolt and detach the radio. Remove the heater control.
- Remove the cluster finish panel and combination meter.
-
Remove the following components:
Finish lower center panelCluster finish panel sub assemblyDuct heater to register No. 2Side defroster nozzle No. 2
- Remove the passenger air bag assembly. Disconnect the wiring harness to the assembly. Remove the 4 bolts and 2 clips. Pull the air bag assembly from the dash.
- To remove the instrument panel, detach the wiring from the components. Remove the 5 bolts retaining the panel. Unbolt the junction block No. 1 and No. 4.
- Remove the screw, 8 bolts and instrument panel.
- Remove the instrument panel reinforcement.
- Installation is the reverse of the removal procedure.