
REMOVAL & INSTALLATION
See Figures 1 through 10
This is a general procedure. Depending on vehicle and model, the order of steps may need to be changed slightly.
- Remove the inner mirror control knob (if manual remote) and remove the inner triangular cover from the mirror mount.
 |  |
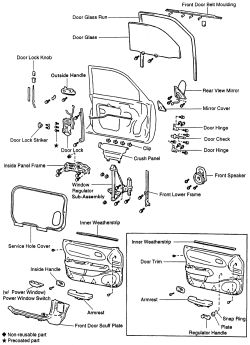
Fig. Fig. 1: Common front door panel components-1995-97 shown

| |
Fig. Fig. 2: Common rear door panel components-1995-97 shown
- Remove the screws holding the armrest and remove the armrest. The armrest screws may be concealed behind plastic caps which may be popped out with a non-marring tool.
- Remove the surround or cover for the inside door handle. Again, seek the hidden screw; remove it and slide the cover off over the handle.

| |
Fig. Fig. 3: Remove the window crank from the door panel

| |
Fig. Fig. 4: Remove the armrest securing screws...

| |
Fig. Fig. 5: ... then pull the armrest off
- If not equipped with electric windows, remove the window winder handle. This can be tricky, but not difficult. Install a piece of tape on the door pad to show the position of the handle before removal. The handle is held onto the winder axle by a spring clip shaped like the Greek letter ?. The clip is located between the back of the winder handle and the door pad. It is correctly installed with the legs pointing along the length of the winder handle. There are three common ways of removing the clip:

| |
Fig. Fig. 6: Remove the door handle screw ...

| |
Fig. Fig. 7: ... and while pulling to one side, unclasp the handle with trim from the panel
| |
Fig. Fig. 8: From behind the handle, separate the linkage
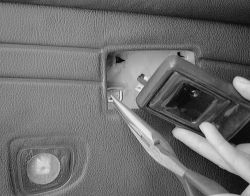
- In general, power door lock and window switches mounted on the door pad (not the armrest) may remain in place until the pad is removed. Some cannot be removed until the doorpad is off the door.
- If the car has manual vertical door locks, remove the lock knob by unscrewing it. If this is impossible (because they're in square housings), wait until the pad is lifted free.
- Using a broad, flat-bladed tool, (not a screwdriver) begin to gently pry the door pad away from the door. You are releasing plastic inserts from plastic seats. There will be 6-12 of them around the door. With care, the plastic inserts can be reused several times.

| |
Fig. Fig. 9: Carefully pry from behind the door panel to disengage the clips

| |
Fig. Fig. 10: Once loose, remove the panel from the door shell
- When all the clips are loose, lift up on the panel to release the lip at the top of the door. This may require a bit of jiggling to loosen the panel; do so gently and don't damage the panel. The upper edge (at the window sill) is attached by a series of retaining clips.
- Once the panel is free, keep it close to the door and check behind it. Disconnect any wiring for switches, lights or speakers which may be attached.
Behind the panel is a plastic sheet taped or glued to the door. This is a watershield and must be intact to prevent water entry into the car. It must be securely attached at its edges and not be ripped or damaged. Small holes or tears can be patched with waterproof tape applied to both sides of the liner.
To install:- When reinstalling, connect any wiring harnesses and align the upper edge of the panel along the top of the door first. Make sure the left-right alignment is correct; tap the top of the panel into place with the heel of your hand.
- Make sure the plastic clips align with their holes; pop each retainer into place with gentle pressure.
- Install the armrest and door handle bezel, remembering to install any caps or covers over the screws.
- Install the window winder handle on vehicles with manual windows. Place the spring clip into the slot on the handle, remembering that the legs should point along the long dimension of the handle. Align the handle with the tape mark made earlier and put the winder over the end of the axle. Use the heel of your hand to give the center of the winder a short, sharp blow. This will cause the winder to move inward and the spring will engage its locking groove. The secret to this trick is to push the winder straight on; if it's crooked, it won't engage and you may end up looking for the spring clip.
- Install any remaining parts or trim pieces which may have been removed earlier. (Map pockets, speaker grilles, etc.)
- Install the triangle cover and the remote mirror handle if they were removed.