
REMOVAL & INSTALLATION
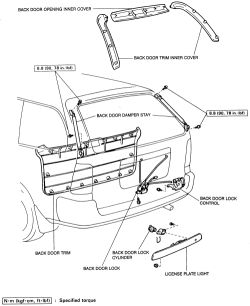
See Figure 1
- Open the tailgate completely.
 |  |
Fig. Fig. 1: Exploded view of the rear tailgate components
- Remove the inner trim panel.
- Disconnect all electrical wiring. Remove the harness and position out of the way.
- Scribe the hinge location on the tailgate to aid in installation.
- Disconnect the damper stays from the tailgate and position out of the way. Disconnect the rear defroster wiring, if equipped.
- Remove the tailgate-to-hinge bolts and remove the tailgate from the vehicle.
- Position the tailgate on the vehicle and align the scribe marks.
- Install the tailgate-to-hinge bolts and secure tightly.
- Attach the damper stays to the tailgate assembly.
- Install the electrical harness and reattach all connections.
- Install the interior trim panel.
- Close the tailgate slowly to check for proper alignment, and adjust as required.
ALIGNMENT
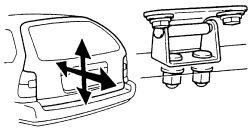
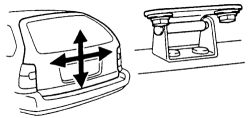
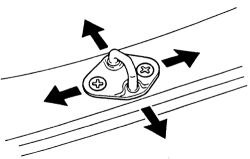
See Figures 2, 3 and 4
To adjust the door in forward/rearward and left/right directions, loosen the body side hinge bolts and position the tailgate as required. tighten the bolts to 9 ft. lbs. (13 Nm).
| |
Fig. Fig. 2: Forward/rearward and left/right adjustment on the tailgate
| |
Fig. Fig. 3: Left/right and vertical adjustment of the tailgate
To adjust the tailgate lock striker, loosen the mounting bolts and using a plastic hammer, tap the striker to the desired position. Removing of the lower trim panel is normally required to access the striker.
| |
Fig. Fig. 4: Adjust the door striker in either of these directions
Vertical adjustment of the door edge is made by removing or adding shims under the hinges.